This guide describes the ParentPlus Portal web application used by parents to view their students’ information and to communicate with school administrators and teachers.
From your ParentPlus Portal, you can view your students' recent scores, grades, report cards, coursework, and attendance. You can also access your students’ portals; view school announcements, alerts, and calendar events; and communicate with administrators and teachers using email or messages.
The features available to you in your portal depend on the permissions set by your school administrator.
Get Started in the ParentPlus Portal Web Application
This chapter introduces you to your ParentPlus Portal web application with login instructions and overviews of portal features. To get started, see the following tasks:
Log in to the ParentPlus Portal Web Application
Depending on your school's PlusPortals setup, the Login page or advanced Login page appears. To log in to your parent portal, follow these steps:
If your school administrator has activated the Health Questionnaire, it will appear when you click Sign In. You must complete and submit the questionnaire to gain access to your portal.
- Type your PlusPortals URL in your browser address bar.
Your PlusPortals URL is located at plusportals.com/YourSchoolName. For example, the URL for "Rediker Academy" would be plusportals.com/RedikerAcademy. You can find your school's URL by looking on your school's website or by asking your PlusPortals administrator.
- If you have a PlusPortal username and password, sign in using your credentials. If you don't have a username and password, follow the instructions in the activation email from your PlusPortals administrator to activate your account and set your password.
- Click Sign In.

If you forget your password, click Can’t access your account. If you are unable to reset your password, contact your school administrator.
If your school administrator has activated a TeacherLists account for your school, you may be prompted to create and post your classroom supply list.
Change Your Password in the Web Application
If permitted by your school administrator, you can change your password using the following steps:
- On the User menu, click [your name] > Change Password.

- In Current password, type the password you're currently using.
- In New password, type the password you want to use.
Passwords must contain at least one lower-case letter, one upper-case letter, one number, and a minimum of eight characters.
- In Confirm new password, type the new password again.
- Click Change Password to save your changes.

Your Parent Portal
When you log in to your parent portal, you see the User menu, Master menu, and the Master menu Home tab. These items are described in the diagrams and tables below. Your school administrator determines the User menu tabs, Master menu tabs, and tab panels that you see in your portal.

| User Menu, Master Menu, and Home Tab Upper Panels | |
|---|---|
A | On the User menu, you can perform the following tasks:
|
B | On the Master menu, you can perform the following tasks:
|
C | On the upper-left section of the Home tab, view Student panels for each student you have in the school. On the Student panel, you can perform the following tasks:
Note: Photos are added by your school administrator. |
D | On the upper-right section of the Home tab, view Upcoming Events for the school as well as your students' class and group events. Coursework posted to the calendar also appear in this panel. |
Switch Roles
If you have multiple roles (such as teacher and parent) in the school, you can switch roles by following these steps:
- On the User menu, click [your name] > Change Role.

- Under Login As, click the appropriate login.

Access Your Student's Portal
To access your student's portal, follow these steps:
- On the Master menu, click Home.
The Student panels appear on the left side of the Home tab. - Locate the student whose portal you want to access.
- On their Student panel, click More. Your student's portal opens.

To view the portal for another student, click that student's photo and click More. To return to your portal, click Home on the Master menu. 
For more information on the student portal, see the StudentPlus Portal User Guide.
Student Health Questionnaire
If activated by your school, the Health Questionnaire will appear when you log on to your portal. You must complete and submit the questionnaire for each of your students before you can access your portal.
Complete a Health Questionnaire
To log in to your parent portal and complete a health questionnaire, follow these steps:
- In your browser address bar, type your PlusPortals URL.
- Enter your credentails and click Sign In.
Your portal opens to the Health Questionnaire page. - Complete both sections of the Health Questionnaire, shown below:
Note: If you have multiple students at the school, you are provided with a questionnaire for each student.
- If you answer yes to any question, follow the instructions that appear at the end of the questionnaire.

- Click Submit. Your portal opens on the Home tab.
If your school has activated a TeacherLists account, you may be prompted to visit the school classroom supply list.
Your Student's Classes
You can view teachers' Class pages, lessons plans, and student schedules, as well as communicate with teachers using portal e-mail. See the following topics for details.
View Your Student's Schedule
To view your student's class schedule, follow these steps:
- On the Master menu, click Home.
- Locate the student whose schedule you want to view.
- On the student's panel, click More.The student's portal opens.

- Click the School tab.

- Click the Schedule tab.
- Optional: From the drop-down list, select the schedule rotation you want to view.
- Optional: To print the schedule, click Print Preview and in the upper-right corner of the screen, click Print. To switch to another student's portal, click that student's photo and click More. To return to your portal, click Home on the Master menu.
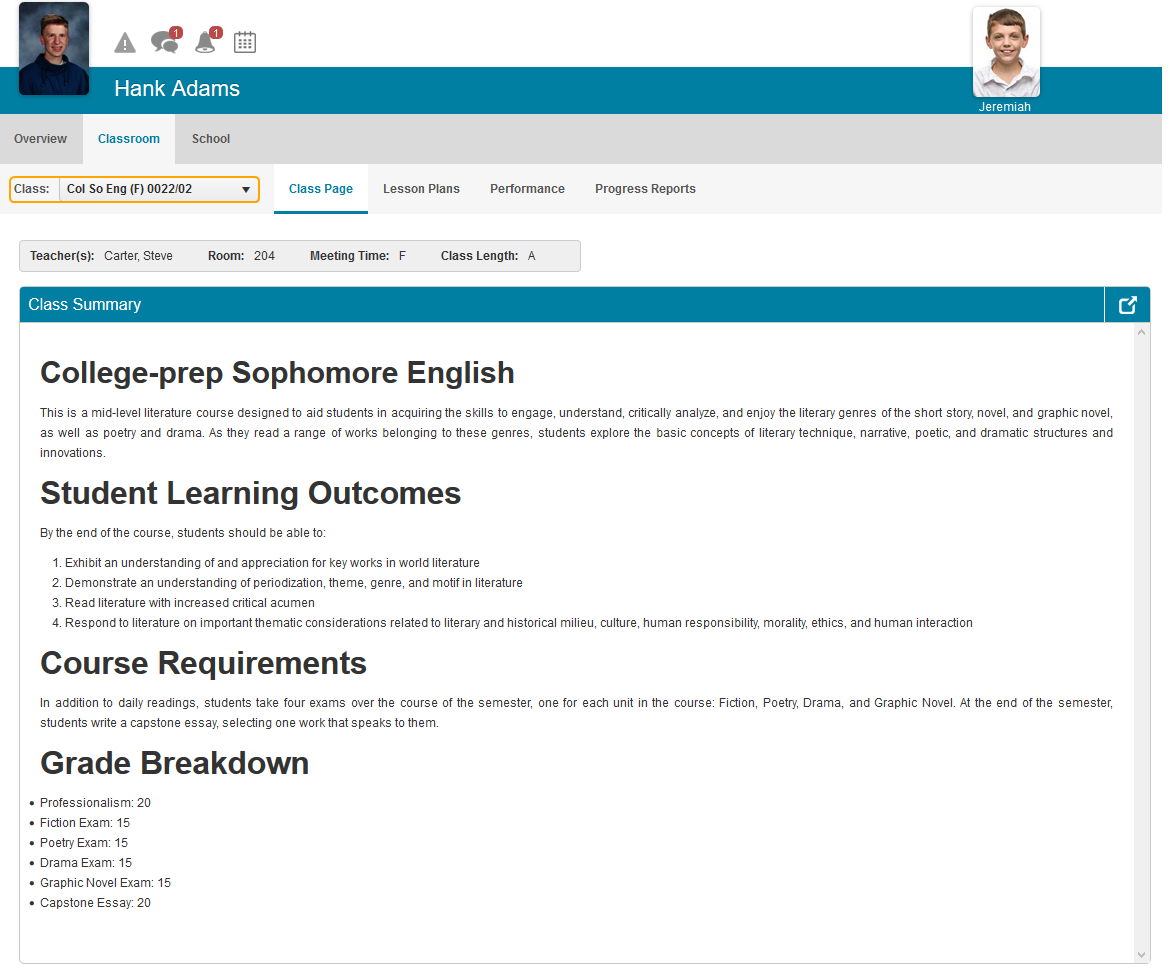
View a Class Page
To view a teacher's class page, follow these steps:
- On the Master menu, click Home.
The Student panels appear on the left side of the Home tab. - Locate the student whose Class page you want to view.
- On the Progress tab, click the class.

Class Summary
The Class Page tab opens with the Class Summary panel at the top. To view a different class, select one from the Class drop-down list.
Coursework Panel
On the Coursework panel, you can view assignments, quizzes, and discussions for the class.

| Coursework Panel | |
|---|---|
A | View upcoming, past due, pending, completed, or all coursework. |
B | View all types of coursework, or view just assignments, quizzes, or discussions. |
C | Print a list of the coursework you're viewing. |
D | View coursework details. |
E | View and/or submit an assignment or a quiz for your student. |
F | For an assignment or a quiz, click |
Class Announcements and Alerts Panel
The Class Announcements and Alerts panel displays communications from your student's teacher.
| Class Announcements and Alerts Panel | |
|---|---|
A | View the title and description for the announcement or alert. Alerts appear in red to indicate a higher importance. |
B | Filter items in a column by clicking |
C | View announcement or alert details. |
D | Navigate between multiple pages of items. |
E | Select how many items are displayed per page. |
Links and Files Panels
The Links and Files panels display links and files posted by the teacher.
| Links and Files Panels | |
|---|---|
A | Select a folder to see all the links or files in that folder. |
B | Filter items in a column by clicking |
C | View a link. |
D | Navigate between multiple pages of items. |
E | Select how many items display per page. |
F | View a file. |
View Your Student's Online Meetings
Follow these steps to view online meetings posted by your student's teachers:
- On the Master menu, click Home.
- Locate the student whose meetings you want to view.
- On the student panel, click More. The student's portal opens.

- On the Overview tab, scroll down to the Online Meetings panel.

Online Meetings Panel AView all meetings or just today's meetings. BView which class the meeting is for. CClick the title to access the meeting. DView a description of the meeting. EView the meeting date and start time.
View Class Alerts and Announcements
This topic describes two options for viewing the announcements and alerts teachers post to their Class pages.
You will only see these options if permitted by your school administrator and the teacher.
On the Class Page
To view class announcements and alerts on the Class page, follow these steps:
- On the Master menu, click Home.
The Student panels appear on the left side of the Home tab.
- Locate the student whose Class page you want to view.
- On the Progress tab, click the class.

- Scroll down to the Class Announcements and Alerts panel.
See the diagram and table below for a description of the Class Announcements and Alerts panel.

| Class Announcements and Alerts Panel on the Class Page | |
|---|---|
A | View announcements and alerts. Note: Alerts appear in red to indicate a higher importance. |
B | Filter items in a column by clicking |
C | View announcement or alert details. |
D | Navigate multiple pages of items. |
E | Select how many items display per page. |
On the Newsfeed
To view class announcements and alerts on the Newsfeed, follow these steps:
- On the User menu, click Newsfeed.

- Scroll down to the Class Announcements and Alerts panel.
See the diagram and table below for details on the Class Announcements and Alerts panel.

| Header | |
|---|---|
A | By default, the panel displays announcements and alerts by class. You can click, drag, and drop additional column headings to sort by the information they contain. You can also click  Click |
B | View the title and description for the announcement or alert. Alerts appear in red to indicate a higher importance. |
C | Open the Class page the announcement or alert is for. |
D | View announcement or alert details. |
E | Navigate multiple pages of items. |
F | Select how many items display per page. |
View Class Files and Links
To view files and links a teacher has posted to their Class page, follow these steps:
- On the Master menu, click Home.
The Student panels appear on the left side of the Home tab. - Locate the student whose Class page you want to view.
- On the Progress tab, click the class

- Scroll down to the Links and Files panel.
See the diagram and table below for a description of the Links and Files panels.

| Links and Files Panels | |
|---|---|
A | Select a folder to see all links or files in that folder. |
B | Filter items in a column by clicking |
C | View a link. |
D | Navigate multiple pages of items. |
E | Select how many items display per page. |
F | View details for a file. Click |
View Class Lesson Plans
To view lesson plans a teacher has posted to a Class page, follow these steps:
- On the Master menu, click Home.
The Student panels appear on the left side of the Home tab. - Locate the student whose Class page you want to view.
- On the Progress tab, click the class.
- On the Classroom tab, click the Lesson Plans tab.

See the diagram and table below for a description of the Lesson Plans panel

| Lesson Plans Panel | |
|---|---|
A | View lesson plans for a different class. |
B | Click |
C | Print the lesson plan. |
D | Click |
E | Read the lesson plan overview. |
F | View assignments and quizzes for the lesson plan. Click |
View and E-Mail Your Student's Teachers
To view a list of your student's teachers and email them, click the Home tab.
On the Progress tab, your student's teachers appear in the Teacher column.
To email a teacher, click ![]() next to the teacher's name.
next to the teacher's name.

Your Student's Coursework
You can view your student's coursework and submit assignments on their behalf.
For more information, see the relevant topic below:
View All Coursework for a Student
To view all your student's assignments, quizzes, and discussions in one place, follow these steps:
You will only see coursework if permitted by the teacher.
- On the Master menu, click Home.
The Student panels appear on the left side of the Home tab. - Locate the student whose coursework you want to view.
- Click the Coursework tab.

See the diagram and table below for details on the Coursework tab.
You can view upcoming assignments by clicking Newsfeed on the Master menu and scrolling down to the Assignments panel.

| Coursework Tab | |
|---|---|
A | View coursework for all classes or for a specific class. |
B | View upcoming, past due, pending, completed, or all coursework. |
C | View all types of coursework, or view just assignments, quizzes, or discussions. |
D | Print a list of the coursework you're viewing. |
E | View the Class page the coursework is related to. |
F | View coursework details. |
G | View and/or submit an assignment or a quiz for your student. |
H | Click
|
View Your Student's Coursework for a Class
You can view assignments, quizzes, and discussions a teacher posts to a Class page. The details you see depend on the type of coursework. You can see assignment and quiz details, but you can only see descriptions and due dates for discussions.
You will only see coursework if permitted by the teacher.
- On the Master menu, click Home.
The Student panels appear on the left side of the Home tab. - Locate the student whose coursework you want to view.
- On the Progress tab, click the class you want to view coursework for.

- Scroll down to the Coursework panel.
See the diagram and table below for a description of the Coursework panel.
| Coursework Panel | |
|---|---|
A | View upcoming, past due, pending, completed, or all coursework. |
B | View all types of coursework, or view just assignments, quizzes, or discussions. |
C | Print a list of the coursework you're viewing. |
D | View coursework details. |
E | Click
|
View Coursework Submitted by Your Students
You can view assignments and quizzes submitted by your students by clicking E-Locker on the Master menu.
The E-Locker panel opens on the Assignments tab, which displays assignments submitted by your students. To see quizzes submitted by your students, click the Quizzes tab.
Assignments Tab
See the diagram and table below for a description of the Assignments tab.

| Assignments Tab | |
|---|---|
A | Preview and print a list of your students' submitted assignments. |
B | Submit an assignment on behalf of your student. |
C | Filter items in a column by clicking By default, assignments are grouped by student, and students are listed in alphabetical order. You can change the order in which students appear by clicking the Name column heading. |
D | View student comments and click an attachment to open it. |
E | View comments left by the teacher. |
F | Delete an assignment on behalf of your student. |
G | Navigate pages of items. |
H | Select how many items display per page. |
Quizzes Tab
See the diagram and table below for a description of the Quizzes tab.

| Quizzes Tab | |
|---|---|
A | View quizzes teachers created in their Lesson Planners or view quizzes teachers posted to their Class pages. |
B | Select the Student whose quizzes you want to view. Select the Class you want to view quizzes for, or select All to view all quizzes for that student. If viewing Lesson Planner Quizzes, select the Unit and Lesson for the quizzes you want to view. |
C | Filter items in a column by clicking |
D | View the answers submitted by your student. |
E | Indicates the quiz has been graded by the teacher. |
F | Navigate pages of items. |
G | Select how many items are displayed per page. |
Submit Assignments for Your Student
You can submit assignments on behalf of your student using E-Locker
Follow these steps to submit an assignment:
- On the Master menu, click E-Locker. E-Locker opens on the Assignments tab.
- Click Upload.
- Click Submit.

See the diagram and table below for details on the Assignment dialog box

| Assignment Dialog Box | |
|---|---|
A | Select the student you're submitting the assignment for. |
B | Select the class the assignment is for. |
C | Select the assignment. |
D | Optional: Type a description for this submission of the assignment. |
E | Optional: Type any comments you or your student have. |
F | Optional: Include a message for the teacher. You can use the text editor to format the text and to add hyperlinks and tables. |
G | If attaching a file, select the file from the Files drop-down list. To delete an attached file, click |
H | If adding a link, click Add New. In Link Text, type the text you want to display in place of the URL, and then type the Link URL. To delete a link, click Delete. |
Grades and Performance
View your student's grades, class performance, and report cards as described in the following topics:
View Your Student's Grades
To view grades for your student's classes, follow these steps:
- On the Master menu, click Home.
The Student panels appear on the left side of the Home tab. - Find the panel for the student whose grades you want to view.
- Click the Progress tab.
- In the drop-down list, select the marking period you want to view grades for.

| Progress Tab Columns | |
|---|---|
Class | Click a class to view the Class Page tab on your student's portal, which displays the class summary, coursework, announcements, and class resources posted by the teacher. |
Average | Click an average to view the Performance tab on your student's portal, which displays your student's progress, category averages, scores, and narratives for the selected class. |
Grade | Click a grade to view the Performance tab on your student's portal |
Teacher | Click |
View Report Cards
To view your student's report card, follow these steps:
- On the Master menu, click Home.
- Find the Student panel for the student whose report card you want to view and click More.

- Click the School tab.
- Click the Report Card tab.

- See the diagram and table below for a description of the Report Card tab.
Because the school administrator determines what information appears on the report card, your student's report card may or may not include all the information described below.

| Report Card Tab | |
|---|---|
A | Preview and print a copy of your students report card with or without narratives. |
B | View your students' class rank. |
C | Depending on permissions set by your school administrator, you can view details of your student's simple and/or adjusted GPA as well as awarded credits. |
D | View your student's grades for each class and for each reporting period. |
E | View Skills and Narratives for each class. |
F | View the key for the Report Card columns. |
View Class Performance
To view your student's performance in a class, follow these steps:
- On the Master menu, click Home.
- Find the Student panel for the student whose class performance you want to view.
- On the Progress tab, click the class.

- Click the Classroom tab.
- Click the Performance tab.

See the diagram and table below for a description of the Performance tab.

| Header | |
|---|---|
A | View general class information. |
B | View a summary of your student's class average and grade for each marking period. Note: For descriptions of the abbreviated column headings, scroll down to the Marking Periods panel. (See P in this table.) |
C | View your student's average for each coursework category. |
D | Print a list of category averages or scores (depending on the panel). |
E | Filter items by clicking |
F | View all your student's scores for the class. |
G | Click and drag a column heading to group scores by that column. In the diagram above, scores are grouped by marking period. |
H | Click |
I | Download files associated with the coursework. |
J | View comments left by the teacher. |
K | View comments from another marking period |
L | View the most recent scores posted by the current date. |
M | Navigate between multiple pages of items. |
N | Select how many items you want to view per page. |
O | View a a chart of your student's recent scores. |
p | View the key for the marking period abbreviations that appear in the summary panel columns. (See B in this table.) |
Communicate with Your School
This chapter describes your options for communicating with your school and your student's teachers. To learn more, see the topics below.
View and Join Online Meetings
Follow these steps to view and join online meetings:
- On the Master menu, click Home.

- Scroll down to the Online Meetings panel.

| Online Meetings Panel | |
|---|---|
A | View all meetings or only meetings for the current day. |
B | View which class the meeting is for. |
C | Click the title to join the meeting. |
D | View a description of the meeting. |
E | View the meeting date and start time. |
View Announcements, Alerts, and Notifications from Your School
This topic describes different options for viewing school-wide announcements, alerts, and notifications.
Alerts are displayed in red to indicate a higher importance.
Home Tab
To view school communications from the Home tab, follow these steps:
- On the Master menu, click Home.

- Scroll down to the Notifications and Alerts or School Announcements panel.
To view details for a posting, click

School Announcements Tab
To view school communications from the School Announcements tab, follow these steps:
- On the Master menu, click School Announcements.
- Click either Announcements, Alerts, or Notifications.
- Click
 for a posting to view more information.
You can also view school communications by clicking Newsfeed on the Master menu.
View School Calendar Events
To view events in calendar or agenda format, click Calendar on the Master menu.
The diagram and table below provide an overview of the Calendar tab.
The Upcoming Events panel on the Home tab displays events and coursework posted to the calendar occurring or due in the next 15 days.

| Calendar Tab | |
|---|---|
A | When you have multiple students, select the check box for the student you want to view events for. |
B | Filter events by selecting a category. |
C | Print Events in list format, or Export Events to an ICS file. |
D | Click the arrows to navigate to a different day, week, or month (depending on the current view) or click |
E | View the calendar one Day at a time, a Week at a time, by Month, or as an Agenda. |
F | Click an event to view more information. |

View School Resources
To view school links and files, follow these steps:
- On the Master menu, click Home.

- Scroll down to the School Links and Files panel.

See the diagram and table below for a description of the School Links and Files panel.

| School Links and Files Panel | |
|---|---|
A | Select a folder to see all links and files in that folder. |
B | View a link. |
C | View details for a link or file. Click |
D | Navigate multiple pages of items. |
E | Select how many items display per page. |
View and Send E-mails from Your Portal
You can send e-mails to and receive e-mails from teachers, school administrators, and group members. Your e-mails are delivered to the recipients' personal e-mail and portal e-mail.
You can communicate with teachers and school administrators using portal messages.
To view and send e-mails, follow these steps:
- On the Master menu, click E-Mail & Messages or E-Mail. The E-Mail tab opens.

- See the diagram and table below for an overview of the E-mail tab.


You can e-mail your student's teacher directly by clicking ![]() next to the teacher's name on the Student panel Progress tab. To get there, click Home on the Master menu.
next to the teacher's name on the Student panel Progress tab. To get there, click Home on the Master menu.
| E-Mail Tab | |
|---|---|
A | Switch between e-mails and messages. |
B | Compose or delete e-mails. |
C | Display only recent e-mails or display all e-mails. |
D | Search e-mails by subject or sender or clear your search history. |
E | Access your inbox, drafted e-mails, or sent e-mails. |
F | Click an e-mail to open it. |
G | Filter your e-mails by subject, sender, or date sent or received. |
H | Open an e-mail ( |
I | Access archived e-mail from previous school years. |
J | Browse forward and back through pages of e-mails. |
K | Select how many e-mails display per page. |
View and Send Messages from Your Portal
You can send portal messages to and receive portal messages from teachers and school administrators.
To view and send messages, follow these steps:
- On the Master menu, click E-Mail & Messages or Messages.

- If not already displayed, click the Messages tab.

See the diagram and table below for an overview of the Messages tab.

| Messages Tab | |
|---|---|
A | Switch between e-mails and messages. |
B | Compose messages. |
C | View your messages. |
D | Filter your messages by name, date sent or received, or status (sent or received). |
E | Open a message. |
F | Reply to a message or delete a message. |
G | Browse forward and back through pages of messages. |
H | Select how many messages display per page. |
View School Directories
You can view contact information for staff, parents, and/or students in the school directories.
Follow these steps to access a directory:
- On the Master menu, click Directory.

- Click the directory you want to view.
- Click a heading below for details on that directory.

Staff Directory
The diagram and table below provide an overview of the Staff Directory.

| Staff Directory | |
|---|---|
A | To find a staff member, type their name and click Search. Note: To return to the full list of staff, click All next to Search by Alphabet. |
B | Print contact information for all staff members. |
C | View all staff members whose last names begin with the letter you click, or click All to view all staff members in alphabetical order. |
D | View contact information for a staff member. |
E | Navigate multiple pages of entries. |
Parent Directory
The diagram and table below provide an overview of the Parent Directory.

| Parent Directory | |
|---|---|
A | To find a parent, type their name and click Search. Note: To return to the full list of parents, click All next to Search by Alphabet. |
B | Print contact information for all parents. |
C | Search for parents by their name, or by their student's name, class, or grade level. If searching by grade level, select the grade from the Select a grade level drop-down list and click Search. |
D | View all parents whose last names begin with the letter you click or click All to view all parents in alphabetical order. |
E | View contact information for a parent. Click View Students to see the students related to that parent. |
F | Navigate multiple pages of entries. |
Student Directory
The diagram and table below provide an overview of the Student Directory.
| Student Directory | |
|---|---|
A | To find a student, type their name and click Search. To return to the full list of students, click All next to Search by Alphabet. |
B | Print contact information for all students. |
C | Search for students by their name, class, or grade level. If searching by grade level, select the grade from the Select a grade level drop-down list and click Search. |
D | View all students whose last names begin with the letter you click or click All to view all students in alphabetical order. |
E | View parent/guardian information for a student. |
F | Navigate multiple pages of entries. |
Your Student's Groups
You can view members, pages, and calendars for groups your student is a member of. For details, see the topics below.
View Your Student's Group Pages
The Group Page tab displays the group summary and any resources and communications posted by group heads. If your student is a group head and if permitted by the school administrator, you can edit content on the Group Page tab.
To view a group page, follow these steps:
- On the Master menu, click Home.
The Student panels appear on the left side of the Home tab. - Find the student whose groups you want to view.
- Click the Groups tab. Click the group you want to view.

You can also access a group by clicking Groups on the User menu, selecting the student in the Select Student drop-down list and selecting the group from the Select Group drop-down list.
On the Groups panel, click the Group Page tab.
See the diagram and table below for details on the Group Page tab.
You can edit the content on the Group Page tab if your student is a group head and if permitted by the school administrator.

| Group Page Tab | |
|---|---|
A | View the group summary. |
B | Edit the group summary. |
C | Select a folder to view the links and/or files it contains. |
D | Add a resource by clicking Add File or Add Link. To delete a resource, click its check box and click Delete. |
E | Open a link or a file. |
F | View details for ( |
G | Navigate between multiple pages of items. |
H | Select how many items you want to view per page. |
I | Add an announcement or alert or delete an announcement or alert. Alerts display in red to indicate a higher importance. |
J | Filter items by clicking |
K | View announcements and alerts posted by the group head. You can also view group announcements and alerts by clicking Newsfeed on the Master menu and scrolling down to the Group Announcements and Alerts panel. |
L | View details for ( |
View Group Calendars
The Group Calendar tab displays group events posted to the calendar by group heads. If your student is a group head and if permitted by the school administrator, you can add, edit, and delete group calendar events.
To view a group calendar, follow these steps:
- On the Master menu, click Home.
The Student panels appear on the left side of the Home tab. - Find the student whose groups you want to view.
- Click the Groups tab.
- Click the group you want to view.

You can also access a group by clicking Groups on the User menu, selecting the student in the Select Student drop-down list and selecting the group from the Select Group drop-down list.

- On the Groups panel, click the Group Calendar tab.
- See the diagram and table below for details on the Group Calendar tab.
You can add, edit, and delete group calendar events if your student is a group head and if permitted by the school administrator.

| Group Calendar | |
|---|---|
A | Select the group events you want to view. |
B | Create a new group event. |
C | Manage calendar events in list format, where you can create, print, export, edit, and delete events. Click Show Events to return to the Group Calendar. |
D | Follow these steps to print calendar events:
|
E | Follow these steps to export calendar events to an ICS file:
|
F | Do one of the following to edit your daily, weekly, or monthly calendar view:
|
G | Click one of the following calendar formats:
|
H | Hover your mouse over an event to view details or double-click the event to edit it. |


View Members of a Group
If your student is a group head, you can view group members, edit the member list, and change group visibility and email preferences.
To view group members, follow these steps:
- On the Master menu, click Home. The Student panels appear on the left side of the Home tab.
- Find the student whose groups you want to view.
- Click the Groups tab.
- Click the group you want to view.

You can also access a group by clicking Groups on the User menu, selecting the student in the Select Student drop-down list, and selecting the group from the Select Group drop-down list. Because your student is a group head for the selected group, the Groups panel opens on the Group Members tab.

See the diagram and table below for details on the Groups panel and the Group Members tab.

| Groups Panel and Group Members Tab | |
|---|---|
A | Select a different student to view groups for. |
B | Select a different group. |
C | Specify who can see the Group Page and Group Calendar tabs by selecting the appropriate check boxes. |
D | Specify who group members can email by selecting the appropriate check boxes. |
E | Switch between the Group Members, Group Page, and Group Calendar tabs. |
F | Type the name of a member you want to search for and click Search. Click Clear Search to return to the full members list. |
G | Add members to or delete members from the group. |
H | Filter items by clicking |
I | The names of school staff who are group members appear in blue. |
J | View information from members' portals, based on permissions set by your PlusPortals admin. |
K | Navigate between multiple pages of items. |
L | Select how many items you want to view per page. |
Student Information and E-Portfolio Documents
The topics below describe how to access E-Portfolio documents, approve courses, and update your student's information.
Access Your Student's E-Portfolio Documents
If permitted by your PlusPortals administrator, you can access your students' E-Portfolio documents using E-Locker.
- On the Master menu, click E-Locker.
- Click the E-Portfolio tab.
- Your students' documents appear in the list. To download a document, click
 .
. Tip: Click
  to filter items in a column.
 - Click
 to select the number of Documents per page that you want to view.
 - Click
 to navigate between pages of documents.
Approve Your Student's Courses for Next Year
You can view and approve your student's course recommendations for the next school year. Courses are recommended, selected, and approved using the course request form.
You will only see course requests for your students if permitted by your school administrator.
Follow these steps to access your student's course request form:
- On the Master menu, click Course Requests.
The Course Requests tab opens with panels for each of your students. - Click View/Edit for the student whose course request form you want to view.
The student's course request form opens, displaying the courses recommended for each subject.

See the diagram and table below for a description of the course request form.

Final course selections are determined by your school administrator.
| Course Request Form | |
|---|---|
A | Click Courses display with check boxes ( Check boxes indicate the student can select multiple courses within a subject, while bullets indicate the student can only select one course. Courses that display in blue have comments or have been approved. |
B | View comments left by your student. |
C | To approve a course selection, select the Approved by Parent check box and, optionally, type a comment. |
D | View comments left by the school staff who reviews and approves your student's course recommendations. |
E | View course details, such as the course description, course length, and number of credits. |
F | A filled bullet ( |
Update Your Student's Demographic Information
You can update your student's demographic information by following these steps:
- On the Master menu, click Home.
The Student panels appear on the left side of the Home tab. - Locate the student whose demographic information you want to update.
- On their Student panel, click More.

- Click the School tab.
- Click the Demographics tab.
- Click Edit.
- Edit your student's information.
- Click Save to save your changes.


Your Portal Preferences
See the topics below to set portal e-mail preferences, update your information, and edit your school directory listing preferences.
Set E-Mail Preferences for Progress Updates
You can set your e-mail preferences to receive updates on your students' class averages and grades as well as assignment scores. The information is e-mailed to you as a report. You specify the information you want included in the report and how often you want to receive it.
Follow these steps to set up automatic e-mail notifications:
- On the User menu, click [your name] > E-Mail Notifications.

- See the diagram and table below for a description of the E-Mail Notifications options.

E-Mail Notifiations AClick Yes to receive an automated report via e-mail. BClick Yes to receive a notification on your mobile device when the e-mail is sent. CSelect how often you would like to receive the report.
DSelect the check boxes for the information you would like to receive. EView and/or edit your school e-mail address. FProvide additional e-mail addresses, separated by commas. GSelect the check box to receive a notification when you save your changes. - Click Save E-Mail Notification Settings to save your changes.
The e-mail you receive will contain a report for each of your students. In the Download column, click to download a report.


Set E-Mail Preferences for Announcements
You can set your e-mail preferences to receive class, group, and school announcements. The information is e-mailed to you as a report. You specify the information you want included in the report and how often you want to receive it.
Follow these steps to set up automatic e-mail notifications:
- On the User menu, click [your name] > E-Mail Notifications.

- See the diagram and table below for a description of the E-Mail Notifications options.

Email Notifications AClick Yes to receive an automated report via e-mail. BClick Yes to receive a notification on your mobile device when the e-mail is sent. CSelect how often you would like to receive the report. DSelect the check boxes for the types of announcements you would like to receive. EView and/or edit your school e-mail address. FProvide additional e-mail addresses, separated by commas. GSelect the check box to receive a notification when you save your changes. - Click Save E-Mail Notification Settings to save your changes.
- The e-mail you receive will contain a report for each of your students. In the Download column, click
 to download a report.


Set E-Mail Preferences for Updates on Pending Assignments
You can set your e-mail preferences to receive a summary of your students' pending assignments. The summary is e-mailed to you as a report.
Follow these steps to set up automatic e-mail notifications:
- On the User menu, click [your name] > E-Mail Notifications.

- See the diagram and table below for a description of the E-Mail Notifications options.

E-Mail Notifications AClick Yes to receive an automated report via e-mail. BClick Yes to receive a notification on your mobile device when the e-mail is sent. CSelect how often you would like to receive the report. DSelect the check box to receive a summary of your students' pending assignments. EView and/or edit your school e-mail address. FProvide additional e-mail addresses, separated by commas. GSelect the check box to receive a notification when you save your changes. - Click Save E-Mail Notification Settings to save your changes.
The e-mail you receive will contain a report for each of your students. In the Download column, click to download a report.


Update Your Demographic Information
You can update your demographic information, such as contact information, using the following steps:
- On the User menu, click [your name] > Edit Demographics.

- Click Edit.
- Edit your information.
- Click Save to save your changes.


Edit Your Directory Listing Preferences
You can opt out of appearing in the parent directory, or you can edit the information that displays for you.
Follow these steps to edit your directory settings:
- On the User menu, click [your name] > Directory Listing.

If the List my information in the school directory check box is selected, your listing will appear in the school directory.
- Do one of the following:
- To opt out of appearing in the school directory, clear the List my information in the school directory check box.
- To appear in the school directory, make sure the List my information in the school directory check box is selected, and then select the check boxes for the information you want displayed for your listing.


- Click Save Directory Settings.