The Lookup screen is displayed by default when you toggle to Multiple Staff. On the Lookup screen, you can view a table of staff demographic data, apply filters to view a subset of the data, and sort the data. You can also view or edit information for a selected staff by clicking the expand icon in the table or the single staff view panel on the left.
For more information about the features of the Multiple Staff Lookup screen, refer to the diagram and table below:

| Multiple Staff: Lookup | |
|---|---|
A | The initial View is DEFAULT_STAFF but other save views can be selected. |
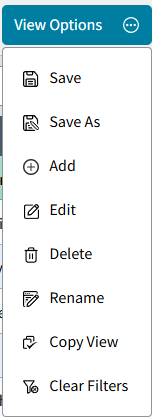
B | Lookup Views sent from Classic Administrator's Plus can be Added and Edited here on the Lookup screen. Any Lookup Views Edited or newly added in AdminPlus.com will not sync back to Classic Administrator's Plus. These are now independent of each other. Any changes made to any views in Classic will not be sent to AdminPlus.com after the initial sync sends the views. Select View Options to see the following options:
|
C | Search for a staff by the demographic field selected on the Lookup screen. The default is Name "Contains" which will search for the sequence of characters. Click on "Contains" to toggle to "Begins with" to search by the initial characters in the staff demographic selected. Click the search icon |
D | Click a column header to sort the data and search by that demographic field. |
E | Click the filter icon
|
F | To include Inactive staff check the box. This setting also applies to the One Staff list. |
G | Click Export to export the view into Excel. |
H | Choose the page to view and the number of Rows Per Page to display. |
I | The number of staff on the page and total number in the view is displayed. |
J | The Single Staff View panel on the left contains the staff's picture, name, address, 2 selected fields, alert indicator, Daily Attendance statistics, Today's attendance status, last attendance status and Schedule at the moment. Click the expand icon |


 and a calandar will open.


