Overview
The AdminPlus SIS organizes student information into demographic fields grouped across multiple pages. The system includes 13 pages with 20 fields each, for a total of 260 demographic fields. Of these, 251 fields are configurable by the school. The first 9 fields are required system fields, and their properties cannot be modified.
Student Demographic Field properties configured in the classic interface can be viewed by the Supervisor under Setup Center > Libraries > Student Demographic Fields.
Fig 1: Overview

On this screen you can:
- Use the page selection dropdown menu (Viewing Fields From), to filter and list fields from only the selected page.
- Search and find a field by name.
- Review the list of fields, which indicates field number and page.
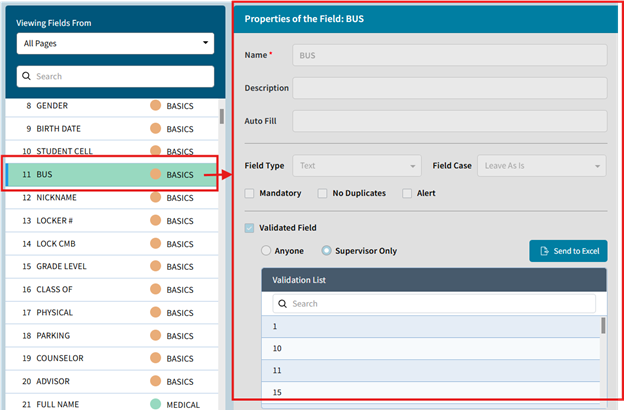
- Select a field to view its Field properties. The Selected field appears with a green highlight.
NOTE: Field properties are currently view-only and cannot yet be edited. Support for editing field properties will be added in a future release. If you are editing your Demographics in AdminPlus.com you can still access and update Field Names and Field Type in AdminPlus Classic under Setup > Data Base > Field Names for Students (without switching edit mode).
Pages
Pages provide a structured way to organize and display demographic fields.
By default, the Setup Center displays fields from all 13 pages. The page name and associated color appear to the right of each field in the list of fields. To filter the displayed fields by page, use the Page drop-down menu (View Fields From) in the upper-left corner.
Fig 2: Pages
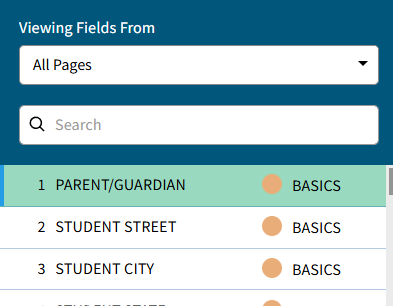
When a page is selected, only the 20 fields assigned to that page are displayed.
NOTE: It is recommended that pages be organized by topic, since permissions can be used to control page access for individual users, including both viewing and editing. For example, if certain information is sensitive, such as medical or billing data, create separate pages for Medical and Billing so access to those fields can be managed through user permissions.
Fields
In your database, a field represents a single basic unit of data, for example, the student's email or birth date.
Fig 3: Fields - Database

On the Setup Center screen, the fields will be listed on the left of the screen, in the default linear field order (1 to 260). When you select a field number on the left panel you will see the field properties displayed on the right.
Fig 4: Fields – Setup Center Screen
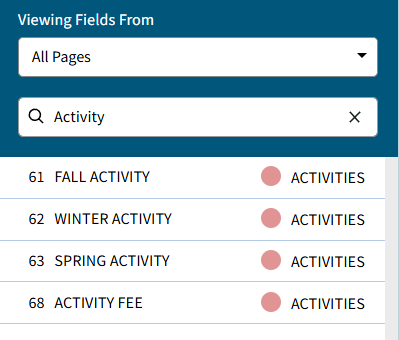
The Search can be used to find a field by name. Typing into the search will return all fields meeting the search criteria (regardless of page or order). This allows you to quickly find and jump to any field in your data.
Fig 5: Fields - Search