Overview
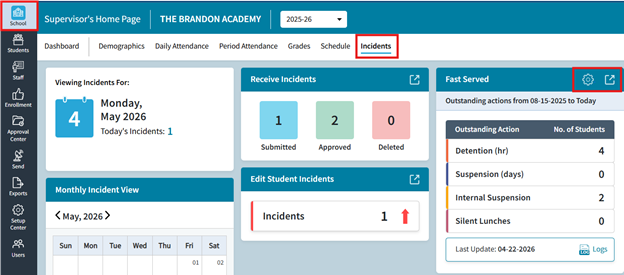
Accessed from the School > Incidents screen using the Fast Served tile, the Fast Served feature allows a user to batch enter a served code for multiple student incidents. The Fast Served feature allows you to generate a list of students with outstanding actions and then serve those actions. For example, you have a dozen students who all attend a detention and now need to be credited for having served that action. The Fast Served feature will allow you to quickly identify and generate the list of students with outstanding detentions, then set a date served as well as Served Code to credit all those students at once. This will save time compared to manually searching for and editing each of the students’ incidents.
Fig 1: Overview
NOTE: If you are looking to add a served code to an individual student incident, do so using either the Edit Student Incidents screen or the student's individual incident entries (One Student: Incident).
Processing Actions
- Access the School > Incidents screen
- On the Fast Served tile, either Click the Gear or click the Navigate Button. Both actions will result in the Fast Served: Settings opening.
- The Fast Served: Settings window opens. You must configure these settings based on the Outstanding Action (Action Summary Code) you would like to update.
Fig 2: Processing Actions – Step 3 (Fast Served Settings)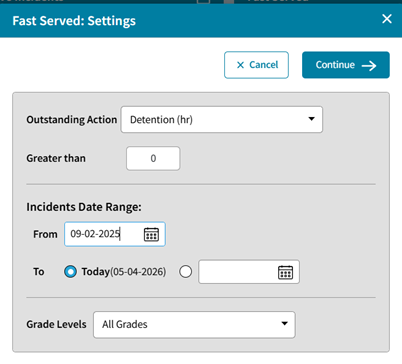
In most cases, you will generate a list of all students with outstanding actions (i.e., a balance greater than 0) from the start of the academic year or for a specified date range, using the applicable Action Summary Code and Date Range. This Fast Served feature produces an organized list of students who have actions “owed” or “due” under the selected Action Summary (for example, students who owe detention).- Select an Outstanding Action. (You are choosing from the Action Summary Codes)
- Enter a number for Greater Than. (In most cases greater than 0 would be recommended)
- Set the Incidents Date Range. (Please note this is specifically looking at the Incident Date, not the Action Date)
- Select which Grade Level(s) to include.
- Select Continue.
- The students found matching the previously entered criteria will appear as a list. You should review this list carefully. You can Print and or Send the list to Excel. Note that currently there is no email option.
Fig 3: Processing Actions – Step 5 (Print and Send)
IF you are generating this list BEFORE a detention session is to take place, it is highly recommended you print or send it to Excel. If you wish to be able to email a list before an action event like a detention session, you can do so using the Incidents Reports. Just run a report to list outstanding actions for the same Action Summary Code and Date range. The reports feature does allow for a generated list to be emailed. - Be sure to also review the Search Criteria (Settings). On the Fast Served page, the Search Criteria is listed on the left. Click the Gear icon to make changes to the search criteria.
Fig 4: Processing Actions – Step 6 (Search Criteria)
- Select a Served Code in the drop down and enter a Served Date. The current date is entered as the default.
- Be sure the date entered reflects and matches the actual date this action is/was served.
- Please note, that ALL students selected will receive the same Served Code and Amount credited (amount with which the selected Served Code is linked to the Action Summary Code; if this is unclear, please review your Codes in the Setup Center).
Fig 5: Processing Actions – Step 7 (Served Code)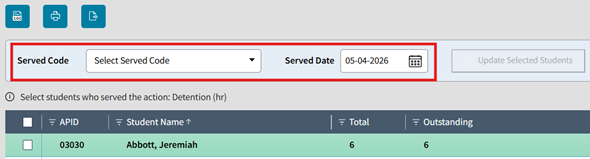
- Next, review and select students. Using either the individual checkboxes to the left on each line, or use the checkbox in the column header row to select all students (left of the APID).
- It is very important that you select only those students who served the action. Be sure that students who were not present are left unchecked (not receiving credit for having served the action).
- For example, below we see student Hank Adams is not selected as he was not present for the detention and thus will not be credited as having served the action. He will not get the DET1- Detention Served: 1 Hour served on this date.
Fig 6: Processing Actions – Step 8 (Select Students)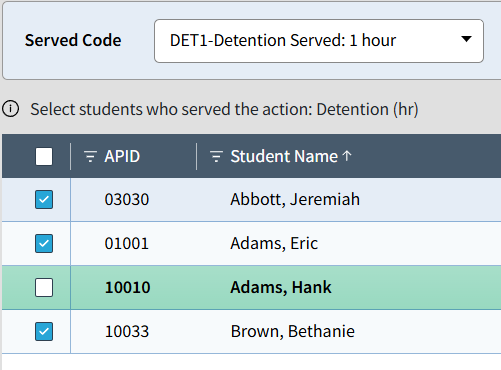
- Click Update Selected Students (to the right of the Served Code and Served Date). This button will be greyed out and not clickable unless at least 1 student is selected from the list.
Fig 7: Processing Actions – Step 9 (Update Select Students)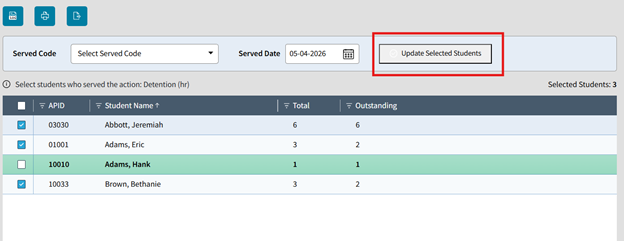
- A confirmation message appears. Click Done. The Incidents Fast Served Log will also auto-download to an Excel file.
Fig 8: Processing Actions – Step 10 (Click Done)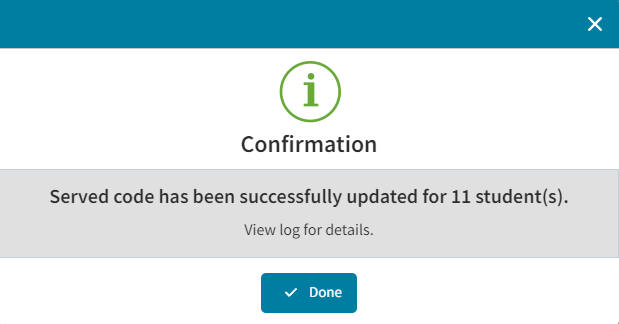
If you instead a Warning, it is indicating that you did not Select a Served Code (Step 7 above). You will have to do so and then click the Update Selected Students Button. - Once you have Updated the Selected Students, you will return to the Fast Served screen. Note that any students now not matching the Search Criteria will be removed from the screen.
For example, if a student only owed 1 Detention (outstanding) and you credited the student with a Served Code of 1 Detention, then that student no longer appears as they now do not have greater than 0 Detentions outstanding. However, if other students previously selected/served, still appear, it is because they still match the criteria and have greater than 0 outstanding Detentions.
Fig 9: Processing Actions – Step 11 (Fast Served Screen)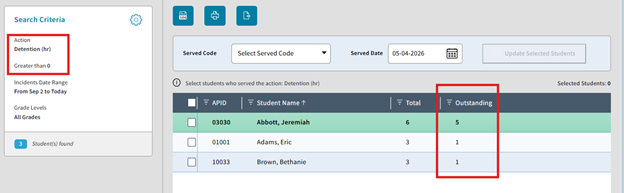
- You can choose to stay on the Fast Served screen and change your Search Criteria or Served Code to batch another group of students and or date. Or you may navigate back to the Incidents or other screen.
Next up, if you are ready to run Incidents Report Lists in AdminPlus.com, then see School: Incidents Reports.