Overview
You can review and receive Incidents data right on the School > Incidents screen via the Receive Incidents tile. The Receive Incidents feature is strictly and only used to review and approve teacher submitted behavior related incidents via PlusPortals. Those incidents will appear in both the Approval Center and on the School > Incidents Screen.
Fig 1: Overview

NOTE: Incidents can only be received in AdminPlus from PlusPortals in this manner via Teacher submitted incidents. PlusPortals may also be configured with an email trigger when incidents are submitted (Communication > Notifications > Incident Notifications).
IMPORTANT: While incidents can also be added via the AdminPlus Mobile App, those are directly added to the individual student incident records and do not pass through the holding bin for approval. This is intentional as only Administrators have access and use of the AdminPlus Mobile App, and thus those incidents do not need approval.
NOTE: Also, of note, is that unlike Daily Attendance which is used to build your Attendance data day by day, Incidents are not connected to the calendar. While incidents have a date, the holding bin and tile will display ALL submitted and approved incidents for the current school year.
Review Submitted Incidents
- Access the School > Incidents screen.
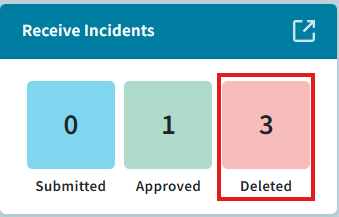
- Locate the Receive Incidents tile. This is in the second column on the screen and displays numbers for Submitted (blue), Approved (green), and Deleted (red) incidents
- Click on either the number of displayed submitted incidents or on the Navigate icon.
Fig 2: Review Submitted Incidents – Step 3 (Click Number or Navigate)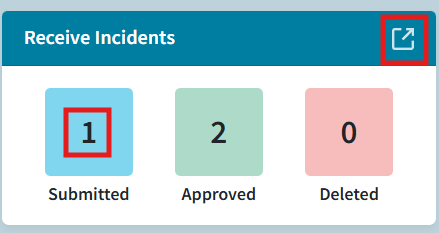
- You should now see the Receive Incidents Screen with the Submitted tab active
- On the left- the submitted incidents
- On the right- the incident details of the currently selected incident.
Fig 4: Review Submitted Incidents – Step 4 (Incident Details)
- You now need to review and approve or delete submitted incidents either one by one (single) or via multi-select.
The review process will vary by how many incidents you have and by whether or not you wish to review incidents one by one OR bulk approve. See details below for either process. - Once an incident is either approved or deleted it moves to that respective tab.
Fig 5: Review Submitted Incidents – Step 6 (Approved and Deleted Tabs)
Once an Incident is submitted from PlusPortals by a teacher, it can ONLY be approved or deleted in AdminPlus. A teacher cannot delete or edit once submitted.
Single Incident Approval
This method is recommended as it allows you to review and edit the details of each incident before approving them. You should pay careful attention to the Incident reported, Action added, and especially the Comment provided by the Teacher. However, this method can be slower if you have greater numbers of submitted incidents from your Teachers.
- On the Received Incidents screen, with the submitted tab active.
- You select an incident on the left (which will cause the selected incident's row to be highlighted in green). Avoid using the checkboxes on the left for this method and process.
- Now review the Incident Details on the right.
Fig 6: Review Submitted Incidents – Step 3 (Incident Details)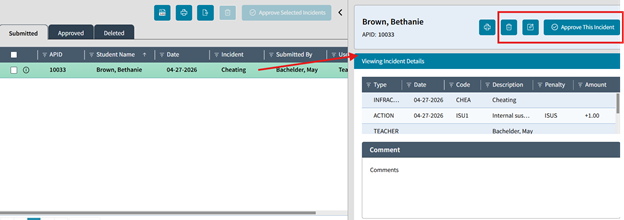
- You have the option to Delete, Edit, and or Approve the incident on the right (above details). These options on the right are only available when a single incident is selected on the left.
Fig 7: Review Submitted Incidents – Step 4 (Approve This Incident)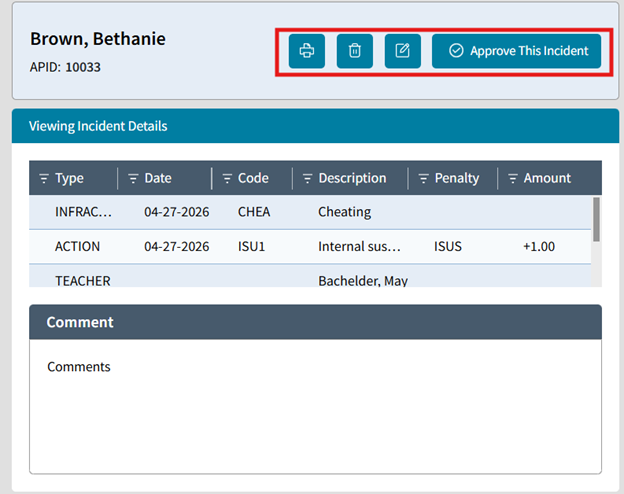
- Once you Approve or Delete the incident it moves to that respective tab.
- Now move to the next Incident and repeat the review process for each Submitted incident as necessary.
NOTE: Again, be sure not to check the boxes on the left side of the screen as that inactivates the single incident approval button on the right. See below for multi-select approval.
Multi-Select Incidents Approval
For multiple incidents, especially larger numbers, you can choose to approve or delete them in bulk. This is done through a process of checking the boxes and clicking the appropriate button. During this process we will NOT use the controls on the right (above the incident details), but instead the check boxes on the far left to select individual incidents or all incidents.
- If you have any concern or need to review specific incidents, you may still select an incident as desired and review the incident details on the right (recommended) before proceeding.
- Check the box on the left to select any number of incidents for either Approval or Deletion. You may check the box on the header row to select all for either Approval or Deletion
- Then on the right side of the screen, click the Delete (trash can icon) or the Approve Selected Incidents button. These buttons are only active when the checkboxes are used for marking incidents.
Fig 8: Multi-Select Incidents Approval – Step 3 (Approve Selected Incidents)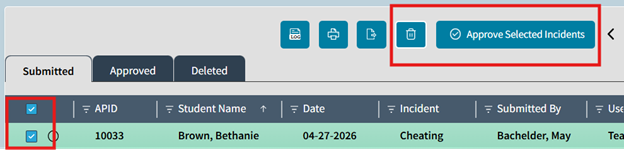
- Multiselecting incidents this way will deactivate the delete and approve incident options on the far right.
- You will need to use the Delete (icon) and the Approve Selected Incidents button on the left side of the screen
- As you Approve or Delete selected incidents, they will move and disappear from the Submitted tab and will then appear in the respective Approved and or Deleted tabs.
- Approved Incidents will then become a part of the student's incidents record (One Student: Incidents).
Approved Incidents
Any incident that was submitted via PlusPortal and then approved in AdminPlus will appear in the Approved Incidents tab.
Receive Incidents Tile
Clicking on the number of Approved incidents on the Received Incident tile will take you to the Receive Incidents screen.
Fig 9: Approved Incidents – Receive Incidents Tile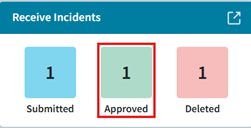
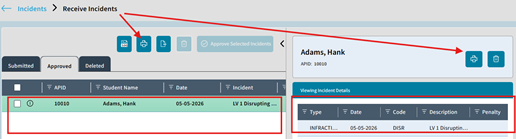
Approved Tab
You will arrive on the screen with the Approved tab active and the first incident selected. If already on the Receive Incident screen you can click on the Approved tab.
Fig 10: Approved Incidents – Approved Tab
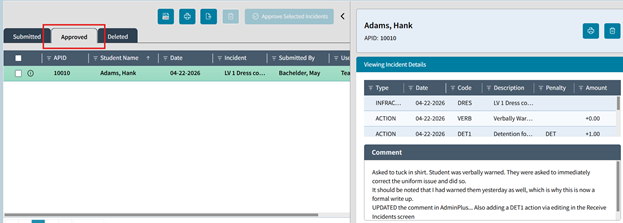
The incidents here are already approved and thus are a part of the students' incidents record. This screen will let you review incident details as well as print or delete an incident. You can multi-select incidents to print, delete or send to Excel for review.
- Once approved, you can still then choose to delete an incident from the Approved Tab.
- If you delete an approved incident, you are deleting it from the student's incident records. This cannot be undone.
- If an approved incident is deleted from this tab, it will then be moved and appear in the Deleted incidents tab.
- Approved incidents cannot be sent back to the Submitted bin (they cannot be set back to pending).
- Once deleted and appearing in the Deleted Tab, you can no longer reinstate the incident.
- You cannot edit an incident from the Approved tab. You would have to access the individual incident from either the School Edit Student Incidents or the One Student: Incidents screens.
- You can click on the Log icon to download an Excel File which will show a complete activity history for the Receive Incidents
Deleted Incidents
Any incident that was submitted via PlusPortals and then deleted will increase the number displayed on the Receive Incidents tile. It will also be displayed on the deleted tab of the Receive Incident screen.
Click the number of Deleted Incidents or the Navigate button.
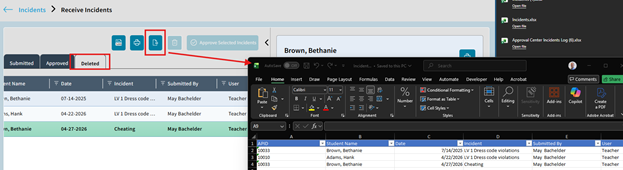
Fig 11: Deleted Incidents
On the Receive Incidents screen the Delete tab lists the deleted incidents on the left. The actively selected incident will have its details displayed on the right. You can print either the list (left print option) or the individual incident details (right print option).
- If you delete a submitted or approved incident, you are deleting it from the student's incident records. This cannot be undone.
- Deleted incidents cannot be sent back to the Approved or Submitted tabs. Once deleted and appearing in the Deleted Tab, you can no longer reinstate the incident.
- You cannot edit an incident from the Deleted tab.
- You can click on the Print or Send to Excel icon to export a list of the Deleted incidents.
- Incidents directly added to a students record and then deleted do not appear here.
Logs
When on the Receive Incidents screen you can click on the Log icon to download an Excel file which is a log of the Approved incidents
Fig 12: Logs

Excel File
The Excel File log includes incident details as well information like the Submitted user (Teacher Email), the Approved User (AdminPlus) and Approved Date & Time.
Fig 13: Logs – Excel File
Please note at this time the log does not include information about deleted incidents. Also, it does not matter which tab you are on (Submitted, Approved, Deleted), the log is a single log that shows only Approved incidents.
There are two print options on the Receive Incidents screen
Fig 14: Print
- On the Left- To Print the list of all incidents from the current tab (Submitted, Approved, Deleted)
- On the Right- To Print the individual incident detail
Sent to Excel
Clicking the Send to Excel icon will take the incidents on the active tab (Submitted, Approved, Deleted) and send them out to an Excel File. This will include just the basic list (not full details) identical to the column showing on the left side of the screen (APID, Student Name, Date, Incident, Submitted By, and User)
Fig 15: Send to Excel