TABLE OF CONTENTS
- Introduction
- Activate DonorPerfect Online Integration
- Setting up fields and Sync in Administrator's Plus
- Mapping fields and sending to DonorPerfect from PlusPortals
- Giving Portal Admins access to DonorPerfect Setup
- Setting up Address codes in DonorPerfect
- Creating fields in DonorPerfect
- DonorPerfect API field Layout
Introduction
DonorPerfect is a complete fund-raising hub to help non-profits raise money, save time, and grow their community of supporters using smart fundraising solutions and data-driven best practices. The DonorPerfect Online (DPO) Application Programming Interface (API) makes it possible for you to populate Donor information from Contacts in Administrator’s Plus.
Check with your DonorPerfect account representative to determine if your DonorPerfect configuration includes the API. If so then the DonorPerfect Interface can be purchased from Rediker for PlusPortals. DonorPerfect provides the API key used to activate the Integration in PlusPortals.
In Administrator’s Plus you will need to setup Contacts, Other Addresses, User Defined and Global fields. in TeacherPlus Setup & Sync Manager is set Send Data for DonorPerfect Integration to Yes. In DonorPerfect you will need to set up corresponding DonorPerfect fields to accept the data. Once the sync is complete, the fields can from Administrator’s Plus can be mapped to the fields in DonorPerfect Online and all Contacts will be available for selection to be sent to DonorPerfect.
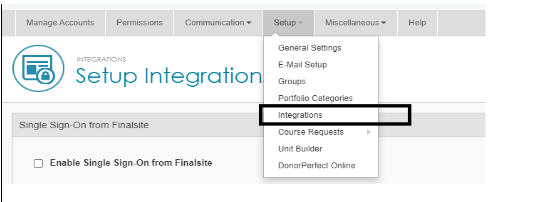
Activate DonorPerfect Online Integration
- In PlusPortals on the navigation bar, Click Setup > Integrations
- Under DonorPerfect Online Integration, select Enable DonorPerfect Online Integration check box.
- Enter the API Key, the API Tag DPPRED and click Save.

Only schools that have purchased the DonorPerfect Interface will have this section in Integrations. The API Key is provided by the DonorPerfect team.
Setting up fields and Sync in Administrator's Plus
- Additional Address types, if needed, can be created in Administrator's Plus. Click on Database, select a Contact, click Other Addresses > Add > Address Type. The Address types selected here must be linked to an Address Code in DonorPerfect, see Setting up Address Codes in DonorPerfect. Most schools do not send additional addresses.

- Sync All the contacts of current year students along with their contact information, Global Field definitions and values.
- From Administrator's Plus > Setup > TeacherPlus Setup& Sync Manager > Send Sync Setting
- B. Send Data for DonorPerfect Integration, click Yes, and then Done.
- Syncing with the Gradebook Cloud Server dialog box appears, initiating an All Data sync.

By default this specification is set to No and only contacts with Parent Portal access enabled are synced to the database. However, if Enable AdminPlus Notify for Mobile Apps or Send Data for DonorPerfect Integration is set to Yes then All Contacts of the current year students are synced.
Mapping fields sent to DonorPerfect from PlusPortals
- Setup > DonorPerfect Online will appear for PlusPortal Admin and any other Admins that have been given permission to DonorPerfect Online, see DonorPerfect Online Setup Permissions

- DonorPerfect Online Settings has 3 tabs
- Address Types - to select any additional Address Types to be sent to the DonorPerfect Online Site. The Contact's Home address is included by default so all additional Address Types can remain unchecked if not needed.

- Donor Info Mapping - to select which Contact User Defined Fields from Administrator's Plus will be mapped to the Donor Info Fields in Donor Perfect.

- User Defined Fields Mapping - to select which Contact Global fields (from Administrator's Plus) to Send to DPO and the DPO Field Name, see Creating Fields in DonorPerfect Online.

- Address Types - to select any additional Address Types to be sent to the DonorPerfect Online Site. The Contact's Home address is included by default so all additional Address Types can remain unchecked if not needed.
- DonorPerfect Online Contacts displays the contact list.
- Send which Contacts can be used to filter the list. Select an option then click Save to keep that view. The number of Contacts appears on the bottom right.

- To send multiple contacts select their check boxes and click Send Contacts to DonorPerfect. Select the checkbox next to Contact Name to select all the Contacts in the Saved view. DonorPerfect can take a maximum or 500 records in a single batch.

- To send an individual contact click the right arrow icon in the last column.

- Possible matches to existing Donors will display once the records are sent. DPO allows a maximum of 500 records at a time to compare so records exceeding that are processed in batches.

- Select Match and click Link Selected Contacts. A confirmation pop-up will appear.

- The Last Send Time indicates when the information was last sent to DonorPerfect. If the Last Send Time is blank than the record was never sent to DonorPerfect. If changes are made to the Contact in Administrator's Plus and a sync to PlusPortals is done then the Last Send time will be updated when the changes are sent to DonorPerfect.
- Send which Contacts can be used to filter the list. Select an option then click Save to keep that view. The number of Contacts appears on the bottom right.
Giving Portal Admins Permission to DonorPerfect
- On the navigation bar, click Manage Accounts
- Click Admin
- Click edit icon next to the Admin user
- On the Update User page, under Setup, select the DonorPerfect Online check box.
- Click Update User.

Only schools that have purchased the DonorPerfect Online Integration will have DonorPerfect Online as an option under Setup
Setting up Address Codes in DonorPerfect Online
- Click Advanced Search
- Enter name to search contact
- View the Contact
- In Address Type click + to Create a new code
- Descriptionshould be the same as the Address Type in PlusPortals

Creating fields in DonorPerfect Online
- Click on Settings icon in top right corner
- Screen Designer
- 'Add New Field'

Data Type selected for a field in DonorPerfect should be like the Field Type for the corresponding field in Administrator's Plus. For example, DonorPerfect Data Type "Character" should be used for fields with Administrator's Plus Field Type "Text". Enter the field name in Prompt and Save for it to appear on the Preview Screen.
DonorPerfect Online Field Layout
| DonorPerfect field name | Pre-mapped field or DPO Info Mapping | Notes |
|---|---|---|
| @donor_id | 0 to create a new donor. If an existing donor is selected in match, all existing values for fields specified below will be overwritten by the values sent in the API. | |
| @title | Salutation | If Title exists in DonorPerfect (ex. Mr. & Mrs) then it won't be overwritten by Administrator's Plus value. |
| @first_name | FirstName | |
| @last_name | LastName | |
| @middle_name | MiddleName | |
| @suffix | SuffixID | |
| @salutation | Donor Info Mapping | Suggest mapping to First Name |
| @prof_title | Donor Info Mapping | Professional Title |
| @opt_line | Donor Info Mapping | Optional Line |
| @address | Street | |
| @address2 | Line1 & Line2 | |
| @city | City | |
| @state | State | |
| @zip | Zip | |
| @country | Country | If Country is blank in AdminPlus it will not overwrite an existing value in DonorPerfect. |
| @address_type | HomeAddress | HomeAddress is the default but other Address Types can be selected |
| @home_phone | HomePhone | |
| @business_phone | OfficePhone | |
| @fax_phone | Donor Info Mapping | |
| @mobile_phone | Mobile | |
| HomeEmail | ||
| @org_rec | N | 'N' to leave it unchecked indicating an individual record |
| @donor_type | IN | 'IN' for Individual donor |
| @nomail | Donor Info Mapping | Receive Mail? Value must be set to 'N' or 'Y' |
| @nomail_reason | Donor Info Mapping | |
| @narrative | Donor Info Mapping | |
| @donor_rcpt_type | I | 'I' for individual receipting preference |
| @user_id | PlusPortals | Name of the API application |
DonorPerfect Knowledgebase article on Using the Addresses Screen