Using a combination of features you can create and edit popups that can be used on your website. Popups appear as a small window as an overlay. Popups are essentially miniature pages with widgets in them. Popups can be set up to appear when something clicked (button or link) or automatically as an action from a triggered personalization rule. Use popups to grab user's attention or provide information without having to change content on your pages. Great for special events like a fundraiser or an outing, especially since popups can contain any widget and content you would place on a page, like images, videos, and buttons.
Rules that trigger popups will only happen once every 30 minutes for the same user/per session. If you need something that always appears, consider using the New Row action for a personalization rule instead of a popup. For something a little less intrusive than a popup considers a notification bar for simple reminders.
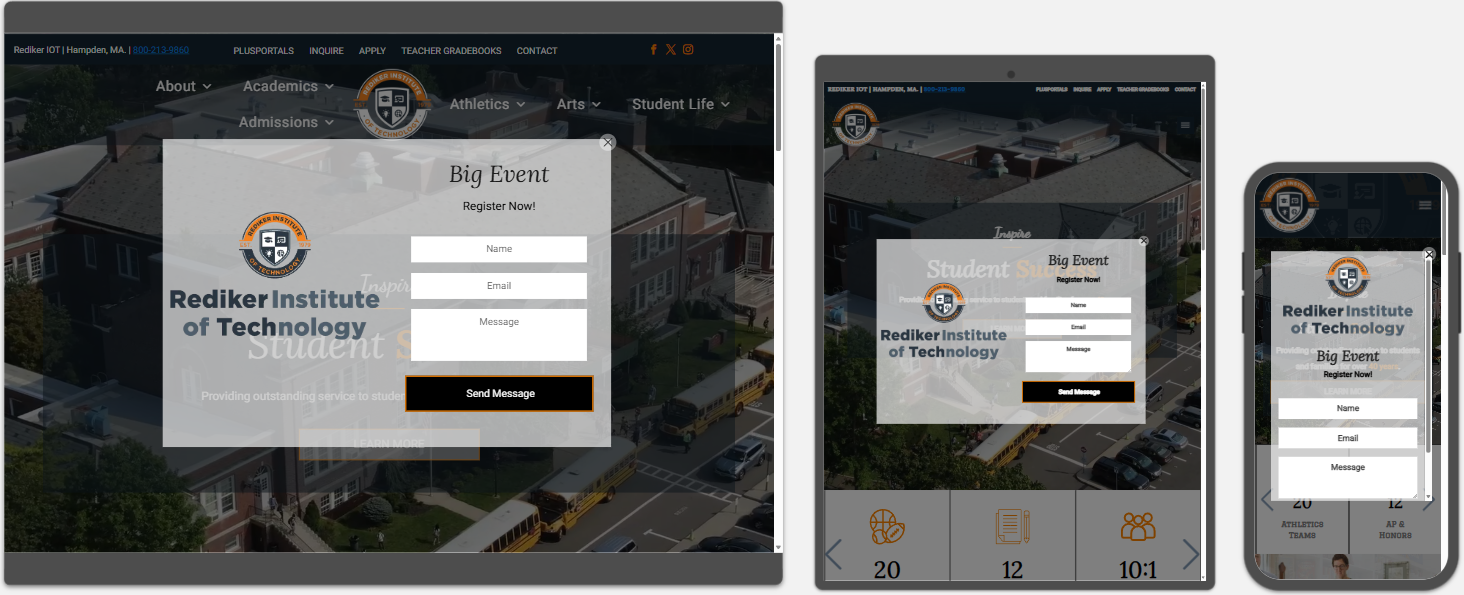
TABLE OF CONTENTS
- Add a Popup
- Activate/View Popups
- Use Personalization Rules to set Conditions
- Other Options and Articles to Consider
Add a Popup
To add a popup:
In the side panel, click Pages, and then click the Popups tab (in upper right).
Click + New Popup.

Select a popup type, like Blank for example. The popup type selected will pre-populate the popup with some select widgets.

Type a name for your popup (make it a short and obvious name like "Golf Outing"), and click + Add Popup.
Please note that popups are considered pages, it is recommended that you include the word Popup in the name, for example, "Golf Outing Popup." This stops a potential conflict, for example, if you name the popup just "Golf Outing" and then decide later to also create a page called "Golf Outing" the system will note that the page already exists. See this article for more details - Popups and Page URL Conflicts.
Edit the popup and its content just like you would a page. Drag and drop widgets, edit the widgets and content.

Activate/View Popups
Unlike a page which when generated is visible in the navigation automatically, a popup can only be visible and triggered by a link being clicked or by using a site personalization rule. Popup triggers only occur once per session. A session is any activity on the site and remains active until at least 30 minutes have passed.Link to a Popup
There are several widgets that allow you to link to a popup, such as Photo Gallery image links, text, and buttons. Linking to a popup is less intrusive on your visitor as it requires them to click a button or link to trigger the popup, giving them control and a choice over viewing the popup as opposed to automatically appearing. Links to popups are also a great way to conserve space on a page; by placing some important content into a popup it saves space on your page. Additionally, popup clicks are tracked as engagement within the built-in statistics in your dashboard.
To link to a popup:
- Click on the widget that you want to link the popup to, like a Button for example.
- Under the widgets Content tab, look for the Link or Linked to Option of the item.
Alternatively, if you are linking from text, highlight the desired text and click the link icon in the text editing menu. - Choose Popup, then select which popup you want to link to from the dropdown menu.

Use Personalization Rules to set Conditions
You can set personalization rules for an existing popup (or other options like notification bar). Personalization rules can include what triggers the popup to appear, how quickly the popup appears on the screen, and more.
Create a Personalization Rule
To create a personalization rule:
- In the side panel under ... More click Personalization.

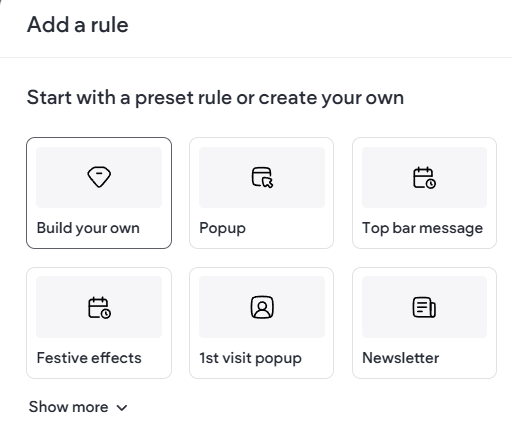
- Select from the available existing rules to edit (by clicking the gear), or Add Rule (for a new rule)

- When adding a new rule, you will get a prompt to pick from either preset rules or to build your own. We recommend you choose Build your own to start, and click Next
- You will then progress through steps where you will set up your rule which includes a Trigger and an Action .
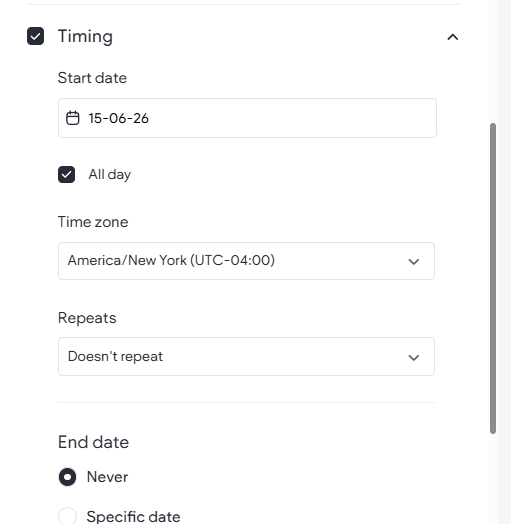
- When building a rule, you will first set the Trigger By- Any Visit or Visits based on conditions. This is what will cause the action to happen in this case, to activate your popup. Typically, people want to set a start/end date/time so, choosing Visits based on specific conditions then followed by Timing are the recommended choices.
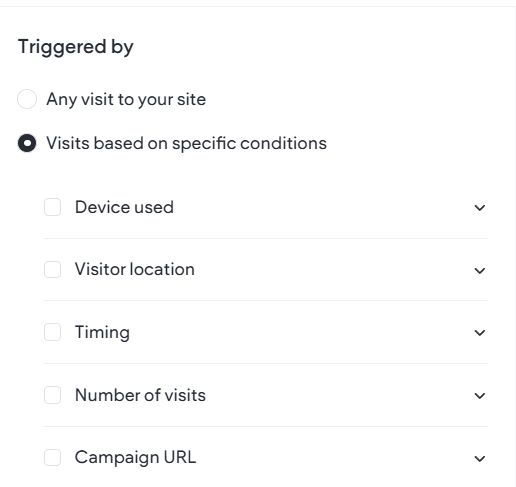
- Select and set your trigger (Triggered By). For example, with Timing you will set a Start and End Date with Time.
- Choose the Action that will happen when the trigger is met. You now set what will happen, for example Show popup, or message bar, etc. You then set which popup, which pages, it positions on the page, and when to show it.
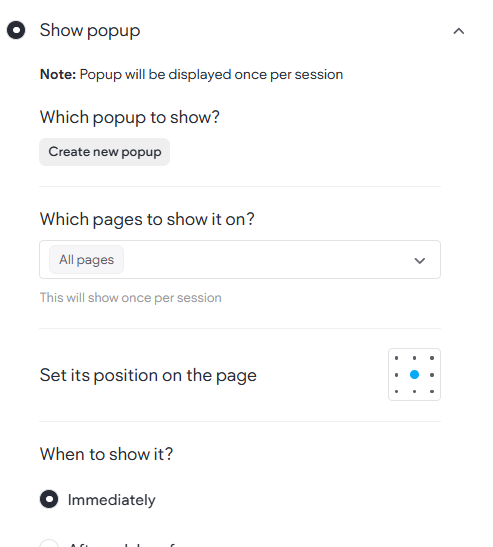
- Which popup?
- Select an existing one
- Or Create a new popup
- Which pages to show it on?
- This now allows for a popup to be on ALL pages or selected specified pages
- Positionon the Page
- You can also set the popup to appear in a specific area
- When to Show it? You also have more options over when the popup will happen
Immediately as the user lands on the page
After a delay of X seconds
When the visitor is about to leave (clicking a button that navigates away from page)
Once the visitor has scrolled X% of the page
- Which popup?
- At the end of the process and steps be sure to:
- Name your rule
- Preview the popup rule
- Choose either Save as Draft or Finish & Activate.

- Finally, Republish the website using the Republish Button. IF the rule is active, open a new browser tab and visit the live site to see your pop-up live.
Rules will typically only trigger for the same user once every 30 minutes, or until they clear their browser cache, even if that user still meets the trigger requirements. See this article for more details and troubleshooting- Personalization Rules.